Sunday, January 24, 2016

Chicken and Herb Drop Dumplings

We were hit with some pretty serious snow this weekend here in the northeast. And when you know you're going to be snowed-in there are certain things you must do. Namely get lots of firewood, an exorbitant amount of food, and make sure your siblings sleep over to enjoy binge-watching tv shows with you. Most always when it is a snowy or particularly cold weekend, I can be found making one of two things (who are we kidding, I make both). Those things being a nice big pot of homemade tomato sauce, and chicken soup. There really are few things better than a veritable hot tub that you have created by boiling some of the simplest ingredients together. There's a reason those books were called chicken soup for the SOUL. Once you taste this chicken broth you will have made yourself, you'll know exactly what I mean.

Yesterday I was particularly excited to try my hand at my own take of chicken and dumplings. You might say this is the perfect comfort food combination of a guy from Central Florida (traditional Chicken and Dumplings) and a girl from North Jersey (who likes a good ol' Matzah Ball soup whenever I can get my hands on the stuff). So here it is folks! Pre-dumpling this recipe is the one I use for the base of most every soup I create, changing up veggies or starches depending on what I have on hand or what we're in the mood for.

You will need:
  • About 2 pounds of chicken cut up- meaning some breast some legs whatever you prefer. However some or all must be on the bone for max flavor. Many supermarkets have a precut on the bone pack of legs and breasts (usually called a griller pack- I always get mine at trader joes)
  • 1 bunch celery chopped in large chunks ( you can also cut some small and add later if you like them in your finished soup)
  • 1 medium or 2 small onions skin removed, quartered
  • 1 head of garlic cut in half across all the cloves (literally cutting it in the middle to expose all the cloves)
  • Small bunch parsley with stems
  • Small bunch dill with stems
  • 6 medium carrots cut in small pieces (add at the end)

For the dumplings: (I adapted mine from Nancy Fuller's recipe which can be found on foodnetwork.com) This will make a good amount of dumpling mixture, I saved mine and plan to make this again for a quick weeknight dinner.

- 2 and 1/4 cup flour
-2 tablespoons butter
-1 tablespoon baking powder
-2 teaspoons salt
- 3/4 cup milk (I used unsweetened plain Almond Milk to keep it lactose free) plus more if needed
-chopped fresh herbs to your liking, I did dill and parsley and added a pretty hefty amount so you could really see the dumplings flecked with herbs

Bring the largest pot you have to boil water with celery, onions, 1/2 head of garlic, 5 sprigs each of dill and parsley (stems and all). Once boiling add 2 tablespoons of salt and chicken pieces. Gently boil on medium heat for 20 minutes uncovered. Cover, leaving a small lip of the pot uncovered for steam to release and lower heat to med-low. Boil for another 15 minutes, take out any white meat chicken and let everything else boil for additional 10 minutes.

During this time make your dumpling mixture. For the dumplings: In a medium bowl, add the flour. Use two butter knives to cut in the butter until it is incorporated and not in large chunks. Next, add the milk, baking powder, salt and eggs mixing with a fork to keep it light. Add additional
milk, 1 tablespoon at a time, if necessary (or flower if you feel like the mixture is way too loose). The dough should be moist but not too wet.

After the additional 10 minutes remove everything from the pot. Taste the broth (this will undoubtedly be the best chicken broth you ever tasted!) for seasoning. If the liquid level seems a little low add water, taste again and add salt and pepper of needed.

Add the diced carrots and celery, boil until soft about 5 minutes with the lid on. During this time pull apart chicken. This will make a lot of chicken so I usually add some to my soup and use some for chicken salad or save for over a salad or in a stir fry.

Once the veggies are soft add the chicken back into the pot. Using 2 small spoons, drop in little balls of dumpling mixture. They will get quite large in the broth so even if your little dough ball seems small, go smaller (we're talking maybe ping-pong ball size or smaller). Gently drop them in and create space with the spoon as you do, so that they don't all stick and become one giant dumpling (though that sounds delicious). Once you've dropped in enough dumplings for your needs (I'd say we had about 20-split among 4 of us which was perfect) put the lid on, reduce the heat to medium and boil for 10-12 minutes. Dumplings will rise to the top and be fully cooked deliciously puffed dough balls.

Turn off the heat and sprinkle herbs over the top. We like it herby here, and used dill, parsley and thyme.

The only thing left to do is enjoy a nice warm bowl of comfort.


Thursday, August 6, 2015

Fast and Fancy Frittata

When your sister returns from a week long trip to Colombia and offers to supply the coffee, the obvious next step is to supply the brunch. After coming back from a wonderful Bridal Shower weekend for one of my lovely Villanova ladies, I had a treasure chest of herbs from her dad's garden. One of those moments where you're basically at your second set of parents' and they feel like you can't leave the house without taking all the food in the fridge, some flowers, a bushel of herbs that they know you will certainly put to good use. 

Well here they are. And if you ask me, they are pretty much the star of this dish. (Ok maybe the herbs AND the goat cheese... because you can't really beat cheese). 

My first recommendation is to prep everything you will need. I had some lovely carved ham left over, about 2 slices, and diced that up into cutesie little cubes. Because who doesn't love a good holiday style ham- am I right? You could certainly use bacon or leave it out all together for a meatless meal. 

Crack and beat the eggs. At least 2-3 per person. If you are feeding my brother you will need at least 4 for him, beware. 

Turn your oven on to broil.

Peel one small russet potato and cut in matchsticks. This is achieved by making slices of potato lengthwise and then stacking and cutting into long sticks.
*If you are cooking this for more than 5 people use a medium potato*

Heat a pan large enough for a single layer on medium high with enough olive oil to just coat the bottom of the pan fully. Fry potatoes like you are making french fries. 
**Sidenote, this is how I make homemade french fries. Sometimes I will even top them dried oregano and lemon juice to make Greek Fries--one of the not so chubby hubby's favorite things in the world**

While they are getting gorgeous in the pan, chop your herbs. You can use whatever you like. There is really no wrong combo here. Today we had what I kept referring to as "Bob's Bounty" of basil, oregano, lemon thyme, and parsley. Usually I am the worst because I have no idea how to tell you how much of each herb I put in. Let's say:
3 sprigs of thyme
8-10 medium to large leaves of basil
2 large sprigs of oregano
1 Tabelspoon worth of chopped parsley

Mix them up together. Put 2/3 of the mix in the beaten eggs.

Now get back to your potatoes. Once golden brown on one side, flip and check one of the fattest pieces for doneness since you may have to lower heat if they are getting brown faster than getting soft. Once cooked through remove to a paper towel lined plate and sprinkle with salt.

Add a tablespoon of butter and ham to a different pan (Make sure to use an oven safe pan!) Make sure the ham is warmed through and then add cooked potatoes. Lower the heat to low and add beaten egg mixed with chopped herbs. 

Mix eggs like you would for scramble until almost cooked through. Add some goat cheese and mix for creaminess. Turn off heat and top with more goat cheese and transfer to broiler for 4 minutes. 

Take out your beauty and top with a pinch of the fresh herbs. Serve with a sliced tomato salad and you may think you are in heaven.


Thursday, February 5, 2015

Can't get enough of these Cavatelli... in under 30 minutes!


For the past few months, I have garnered a mild obsession with cavatelli pasta. The way it curls in on both sides, creating the cutest fluffy, pillowy pasta with pointy ends. Especially when it is fresh and hand-rolled. You can imagine my excitement when I stumbled upon cavatelli in the fresh pasta case at the supermarket the other day, and made by my favorite refrigerated pasta brand Vitamia.

Just across from the pasta case, Brussels sprouts were staring at me all "pick me! pick me!" So I plop them in my cart, and as I stroll through the store it hits me. BACON. Bacon + Brussels sprouts + pasta = Heaven.  Throw in some toasted hazelnuts and a sprinkle of pecorino romano "dust" and you're on the way. Drizzle some balsamic glaze, and you've hit a home run.


The wow factor of this meal could best be described by the text response I received from my brother as I taunted him with a picture of my dinner. “WHOA, did you make that?!”  Followed by “Restaurant quality for sure,” when I told him that why yes, yes I did make that indeed. And all in under 30 minutes.


This will make 4 lighter portions (think app or entrée if served with salad) or 2 larger portions with enough for leftovers.


What you need:

1 package fresh or dried cavatelli pasta, cooked al dente according to package directions

3 strips of bacon, cut into thin slices (lardons)

5 brussels sprouts, cut in half and then thinly sliced (add more to your liking)

½ cup dry roasted unsalted hazelnuts, smashed (I do mine in a Ziploc with my meat mallet)

Pecorino Romano cheese, thinly grated

Balsamic glaze (you can find this in most stores now, I usually get mine at Trader Joe’s)


The How To:

Cut the bacon and put in a large pan over medium heat. While the bacon begins its journey to crispy perfection, bring a large pot of water to a boil.

Shave the brussels sprouts by cutting them in half and putting the flat side down, cutting across into thin strips until you reach the woody stem piece. Smash hazelnuts in a plastic bag. I like to make sure some get really finely smashed while some stay chunkier.

Once crispy, drain the fat from the bacon pan and add the cooked cavatelli. Add a little olive oil if necessary, and taste for saltiness since the bacon may add all of the salty flavor that you need. Cook the bacon and pasta in the pan until some of the cavatelli pieces start to get that nice toasty look.

Turn off the heat, stir in the shaved brussels sprouts and taste again for proper seasoning adding salt and pepper if needed. Plate portions, top with nuts and sprinkle with pecorino cheese. Drizzle with balsamic glaze and you are DONE.

How easy was that?!
Follow me on instagram @mynotsochubbyhubby to get a glimpse of more mouthwatering meals!

Thursday, October 6, 2011

Behold the Butternut!

As the dog days of summer come to a close, the crisp cool air of autumn brings changing leaves, amazing colors and bountiful culinary inspiration. Fall is absolutely my favorite season--and not solely because it is the season which my birthday lays claim to—but because most of my favorite produce is in season right about now. Luckily, if you are in the right location, you can even find a place to pick-your-own of what fall has to offer… apples, pumpkins, gourds, squash- you name it, you can pick it. Those of you who know me can agree that I will eat just about anything that has the word “pumpkin” in front of it. Even Starbucks hails pumpkin spice to be the king of all hot frothy beverages during this season.
But I’m not going to give you a recipe about pumpkin… I’m here to tell you about pumpkins little cousin, equally as intense in color, flavor, and endless possibilities—behold the Butternut Squash! I can recall the exact moment I first tasted butternut squash soup; how the warm silkiness of it made me want to sit near a fire wrapped in my coziest sweater. The inherent sweetness of the squash lends itself perfectly to being roasted in the oven. Throw in some apples, onions, garlic, and rosemary and you have a sweet and savory masterpiece. You would not believe how easy it is (in fact the most intense part of this recipe is the chopping), just pop the veggies in the oven, then throw them in the food processor and you’re 98% of the way there! The great news is that buying produce in season allows you to buy them at the peak of freshness with the lowest price tag; your stomach and wallet will thank you.
This recipe will make a pretty good amount of soup but you can keep it in the fridge or even freeze it!
What you’ll need:
2 medium or 1 large Butternut Squash, seeded and chopped
2 large or 3 medium apples (I use Gala but you can certainly use your favorite) chopped
1 large sweet yellow onion—cut in half then in thirds to create wedges
3-4 large garlic cloves – smashed
2 large sprigs of rosemary, finely chopped
Olive oil
Salt
Pepper
2 cups of low sodium chicken stock

Begin by preheating the oven to 375.
I find the easiest way to peel a Butternut squash is to cut it where the bulb meets the longer skinny part. Then I peel the bulb the same way you would a cantaloupe with a knife, and the top works perfectly well with a peeler (just make sure you keep peeling until you see the bright orange flesh).


Then cut the bulb in half and seed it by scraping with a spoon.


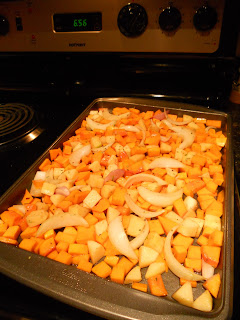
Cut the squash in slices and then cubes about the size of your thumbprint. Peel and seed the apples and cut in cubes roughly the same size as the squash. Then chop the onion in wedges (almost like an orange) and smash the garlic by putting your knife flat on top of the bulb and pushing down. Strip the rosemary leaves off the stem then finely chop.
Arrange all of the chopped veggies and garlic in an even layer on a sheet pan (use two if you have too many veggies) and sprinkle with olive oil, salt, pepper, and rosemary then toss to coat.

Place in the oven for 40-45 minutes or until the squash is fork tender, stirring halfway.
When the veggies are close to being done, heat the 2 cups of chicken stock in a pot. Remove the veggie mix from the oven and spoon it in batches into a food processor (be careful it’s hot!). *You can also reserve a spoonful of the veggies to use on top of your soup as a garnish.*Puree each batch until smooth and add it to the chicken stock, stirring with a whisk to incorporate them into a creamy mixture. You can add more stock depending on how thick you want your soup to be. Voila! You’re done! This soup certainly shines on its own, but I added beef kielbasa sausage on top for a little kick. 

 You can add just about anything you like--chicken sausage, shredded chicken, 2 mushroom ravioli, 2 or 3 jumbo sautéed shrimp or enjoy alongside a delicious Panini!
Sidenote: I’ve been writing this while sitting on my balcony in a warm sweater, glorious pashmina scarf, with a “Madagascar Spice” candle giving off the most amazing aroma of cinnamon… so I think it’s about time I went inside and warmed up a bowl of soup!

Thursday, August 25, 2011

Better for your Budget

Orange Balsamic Chicken Thighs
Here’s a great meal that will make you feel like you went out to a nice restaurant, but your wallet won’t feel that way! This entire meal costs less than $30 and is absolutely stunning on the plate, and even better in your stomach.  Chicken thighs really give you a bang for your buck and this sauce takes them to a whole new level. I served the chicken on a bed of polenta (almost like grits, they are both made from cornmeal, but polenta is sort of the Italian mashed potato) and sautéed spinach to soak up the orange balsamic glaze. This recipe makes enough for you and your honey, grab a bottle of red wine and enjoy!

4 Chicken thighs- skin on
¾ cup Balsamic vinegar
2 tbsp apricot marmalade (you could use peach or orange as well)
½ cup Orange juice
¾ cup low sodium Chicken stock
1 sprig Rosemary, finely chopped
2 scallions (whites and light green parts only)
1 ½ tsp salt
1 tsp fresh cracked pepper

For Polenta:
2 cups low sodium chicken stock
1 cup water
8oz instant polenta (you can find polenta in most grocery stores)
1tbsp butter (at room temperature it will melt much quicker)
2tbsp half and half
1 cup grated Pecorino Romano cheese
2 sprigs rosemary finely chopped
1tsp salt
1 tsp fresh cracked pepper

For the Spinach
1 bag triple washed spinach
1 tbsp olive oil
1 clove of garlic, smashed (but not chopped)
1 small shallot, minced
Salt and pepper
Splash of water


This whole menu happens pretty quickly, everything happens in the time it takes to cook the chicken all the way through. To get started, heat a large non-stick pan with rounded sides (you wouldn’t want to lose any of that amazing sauce-trust me) to medium high heat. Add the chicken skin side down sear that side until this skin forms a golden crust. Sprinkle the other side of the chicken with the salt and pepper. While the chicken is searing, begin boiling the liquid combo for your polenta.
Once the skin has browned, flip the chicken-- the skin will have released some fat into the pan which is perfect for cooking on the other side. At this time, lower the heat to medium and add the remaining ingredients for the chicken all into the pan together and cook for 10-15 more minutes until it is cooked all the way through and the liquid in the pan has formed a glaze.
In another pan, add the olive oil for the spinach as well as the garlic clove and bring to medium low heat. By heating the smashed garlic and olive oil, the garlic flavor infuses into the oil. Once hot, remove the garlic clove and add in the shallots. Once the shallots have become translucent, add the entire bag of spinach along with a splash of water to help it steam and wilt, stirring continuously until all of the spinach has wilted. Add salt and pepper to taste and cover with a lid to keep warm.
After cooking the spinach, the water for the polenta should be boiling. Pour in the instant polenta, turn of the heat and whisk until the polenta becomes a smooth creamy mixture. Add in the remaining ingredients and whisk until incorporated. Cover the polenta with a lid to keep warm.
Once the chicken is cooked through, turn to coat all sides of the chicken and turn off the heat.
To plate: create a puddle of polenta on the plate, topping with the spinach and 2 chicken thighs. Spoon sauce over chicken, pop the cork on the wine, and you’ve turned your kitchen into a gourmet restaurant!

Monday, August 15, 2011

Date Night! Lemon Caper Pork Chops, Easy Cheesy Rice, and String Beans

One of the largest complaints I hear about pork chops is that people just can’t seem to keep them moist. For me, the key to juicy piggy deliciousness is to brine them. Brining food in a saltwater mixture before you cook them helps them to become flavorful and tender. You will need enough brine to completely submerge the pork chops without any part being out of the liquid. Ideally, brine the pork for at least an hour, but if you only have a half hour you will still impart enough flavor and juiciness to do the trick.
I like to find a bowl or a Tupperware container that will hold both pork chops. Then, I fill a small amount of the container with hot water and add 3 tablespoons of sugar and 3 tablespoons of salt (the hot water ensures that they will dissolve into the liquid). Once dissolved, add cold water to fill the container almost completely and put your pork chops into the liquid. I also like to add some fresh course-ground pepper to the brine. Cover with plastic wrap and leave in the refrigerator. The rest of this romantic meal only takes 25 minutes (exactly the amount of time it takes to cook the rice according to the package directions)!

What you need for a romantic candlelight meal:
Pork chops:
2 Pork Chops (about 1 ½ inches thick)
Drizzle of olive oil
Salt and pepper to taste
Juice of 1 lemon
Splash of Vermouth (optional)
1 tablespoon of capers


For the Easy Cheesy Rice:

1 box of Rice Pilaf or Wild Rice
1 wedge of Laughing Cow Light Creamy Swiss Cheese

For the String Beans:
1 bag of Steam-in-the Bag string beans
Juice of ½ lemon
Drizzle of olive oil
Salt and pepper

Take the pork out of the brine and place on to a plate drizzled with the olive oil, salt, and pepper.

Begin cooking the rice according to the package directions. The rice should take approximately 25 minutes to absorb all of the water. About halfway through (12 minutes or so) begin to heat the pan for the pork chops on high. You are going to sear the pork chops first. Searing is creating a crust all over the outside of the chop to seal in the juices, then lowering the heat to cook it all the way through.
Once you create a nice golden brown crust on the outside of the chop, lower the heat, squeeze in half of the lemon along with the splash of vermouth, and cover with a lid to create a lemony hot tub. Allow the chops to cook about 6 minutes per side, flipping once and adding the rest of the lemon juice and capers covering with the lid again.


At this time also microwave the string beans according to the package directions. Once cooked sprinkle with lemon, olive oil, salt and pepper and mix to make sure everything is evenly coated.

Once the rice has absorbed all the water, stir in the Laughing Cow cheese.  To plate: place rice in the center of the place with the pork chop laying on top, pouring some of the pan sauce over. Add string beans and enjoy!


Thursday, August 11, 2011

Sweet Peas for my Sweet Pea

Sweet Pea Ravioli

When you’re in the mood for something like ravioli, you don’t have to go looking in the freezer section or spend your money at a restaurant. When I get the itch for ravioli I head straight for the supermarket! This time, I thought I’d fill it with some sweet peas for my sweet pea.  Making homemade ravioli not only looks impressive, but is incredibly simple and wonderfully fresh-tasting. Create a great shortcut for yourself by using Wonton Wrapper pasta sheets (you can find them in almost every supermarket) and frozen sweet peas (they are frozen at the very peak of their freshness and taste delish!), and you’ve got an elegant meal in no time. Create a simple sauce with just one pint of bursting cherry tomatoes and sliced garlic and you’re transported straight to flavor town!
You could also make tortellini, which is what I did with the leftover pasta sheets and filling (I’ll give you the how –to at the end of the ravioli recipe). To be totally honest, you may have to control yourself from eating this filling with a spoon! For those of you who have never had the pleasure of the magical combination that is peas and mint, it may quickly become one of your favorites! You could also use it as a dip, spread on a sandwich or appetizer on top of some toasted baguette slices. You’ll notice that this recipe makes a lot of filling, but it’s so delicious and versatile that I love to have extra on hand.
For the filling:
One box of frozen sweet peas
One large clove of garlic, chopped
¼ cup fresh grated Pecorino Romano cheese
3 tablespoons part skim ricotta cheese
1 teaspoon chopped fresh mint (that’s about 8 medium-large leaves)
1 tablespoon olive oil
Salt and pepper to taste

Simple Sauce:
Sprinkle of olive oil
1 pint cherry tomatoes
1 large clove of garlic, sliced or diced

To wrap the ravioli you need:
Wonton wrappers
Damp paper towel
Small bowl of water

To create the filling, you will need to first cook the frozen peas. Most packages of frozen peas now come with a bag that you can steam the peas right in the microwave. If not, just drop them right into some boiling water for about 3 minutes. While the peas cook, throw a few chunks of Pecorino Romano into a food processor (so much easier than the cheese grater arm workout). Don’t forget to save a little for later to sprinkle on top. Strain the peas and then throw them right into the food processor with the garlic, ricotta, chopped mint and olive oil. Give the mixture a whirl until it begins to form a puree (don’t worry if it doesn’t catch all of the peas, I like mine a little chunky so that you can still tell there are peas in there).  Once the puree has formed, taste it and add salt and pepper accordingly giving it one more whirl in the processor.
To fill your ravioli, create a little assembly line. I find that doing it on a cutting board is easiest with a landing plate next to it for your filed ravioli. Remove some wonton wrappers from their package and place between a damp paper towel so they do not dry out. . I like to suggest about 8-10 ravioli per person if this is your main course (5 for a side dish).   

Place a small dollop (I use a teaspoon) into the middle of the pasta sheet. Dip your finger in the water and spread along two adjacent sides, folding the dry sides to seal (as if you were going to seal an envelope). Make sure to try and press gently squeezing out as much air as possible. If you want to get a little fancy you can crinkle the edges with the back of a fork.

While the water boils, heat up a medium-sized saucepan with a sprinkle of olive oil. Add the cherry tomatoes, once they begin to burst lower the heat and add the garlic and sauté together making sure not to let the garlic turn brown. Once the garlic is cooked slightly, turn of the heat. When the salted water is boiling gently drop the ravioli in one at a time. Since the wonton sheets are so thin they will only take about 3 minutes to float to the top.  With a slotted spoon, gently scoop out the ravioli and place them directly into the saucepan with the tomatoes. Plate your ravioli and sprinkle the remaining Pecorino on top. Simply delicious!

If you want to get REALLY fancy, by adding just a few more steps you can turn this ravioli into tortellini. After folding the ravioli in half into a triangle, take the point (the one that makes a 90 degree angle), brush it with water and fold it up onto the portion of the pasta with the filling.

Pick up the pasta with the folded point facing you. Gently take the 2 ends, wetting one, and folding underneath the dry end.


Voila! Tortellini!