Thursday, October 6, 2011

Behold the Butternut!

As the dog days of summer come to a close, the crisp cool air of autumn brings changing leaves, amazing colors and bountiful culinary inspiration. Fall is absolutely my favorite season--and not solely because it is the season which my birthday lays claim to—but because most of my favorite produce is in season right about now. Luckily, if you are in the right location, you can even find a place to pick-your-own of what fall has to offer… apples, pumpkins, gourds, squash- you name it, you can pick it. Those of you who know me can agree that I will eat just about anything that has the word “pumpkin” in front of it. Even Starbucks hails pumpkin spice to be the king of all hot frothy beverages during this season.
But I’m not going to give you a recipe about pumpkin… I’m here to tell you about pumpkins little cousin, equally as intense in color, flavor, and endless possibilities—behold the Butternut Squash! I can recall the exact moment I first tasted butternut squash soup; how the warm silkiness of it made me want to sit near a fire wrapped in my coziest sweater. The inherent sweetness of the squash lends itself perfectly to being roasted in the oven. Throw in some apples, onions, garlic, and rosemary and you have a sweet and savory masterpiece. You would not believe how easy it is (in fact the most intense part of this recipe is the chopping), just pop the veggies in the oven, then throw them in the food processor and you’re 98% of the way there! The great news is that buying produce in season allows you to buy them at the peak of freshness with the lowest price tag; your stomach and wallet will thank you.
This recipe will make a pretty good amount of soup but you can keep it in the fridge or even freeze it!
What you’ll need:
2 medium or 1 large Butternut Squash, seeded and chopped
2 large or 3 medium apples (I use Gala but you can certainly use your favorite) chopped
1 large sweet yellow onion—cut in half then in thirds to create wedges
3-4 large garlic cloves – smashed
2 large sprigs of rosemary, finely chopped
Olive oil
Salt
Pepper
2 cups of low sodium chicken stock

Begin by preheating the oven to 375.
I find the easiest way to peel a Butternut squash is to cut it where the bulb meets the longer skinny part. Then I peel the bulb the same way you would a cantaloupe with a knife, and the top works perfectly well with a peeler (just make sure you keep peeling until you see the bright orange flesh).


Then cut the bulb in half and seed it by scraping with a spoon.


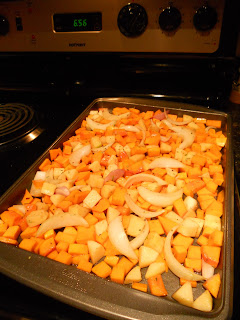
Cut the squash in slices and then cubes about the size of your thumbprint. Peel and seed the apples and cut in cubes roughly the same size as the squash. Then chop the onion in wedges (almost like an orange) and smash the garlic by putting your knife flat on top of the bulb and pushing down. Strip the rosemary leaves off the stem then finely chop.
Arrange all of the chopped veggies and garlic in an even layer on a sheet pan (use two if you have too many veggies) and sprinkle with olive oil, salt, pepper, and rosemary then toss to coat.

Place in the oven for 40-45 minutes or until the squash is fork tender, stirring halfway.
When the veggies are close to being done, heat the 2 cups of chicken stock in a pot. Remove the veggie mix from the oven and spoon it in batches into a food processor (be careful it’s hot!). *You can also reserve a spoonful of the veggies to use on top of your soup as a garnish.*Puree each batch until smooth and add it to the chicken stock, stirring with a whisk to incorporate them into a creamy mixture. You can add more stock depending on how thick you want your soup to be. Voila! You’re done! This soup certainly shines on its own, but I added beef kielbasa sausage on top for a little kick. 

 You can add just about anything you like--chicken sausage, shredded chicken, 2 mushroom ravioli, 2 or 3 jumbo sautéed shrimp or enjoy alongside a delicious Panini!
Sidenote: I’ve been writing this while sitting on my balcony in a warm sweater, glorious pashmina scarf, with a “Madagascar Spice” candle giving off the most amazing aroma of cinnamon… so I think it’s about time I went inside and warmed up a bowl of soup!

Thursday, August 25, 2011

Better for your Budget

Orange Balsamic Chicken Thighs
Here’s a great meal that will make you feel like you went out to a nice restaurant, but your wallet won’t feel that way! This entire meal costs less than $30 and is absolutely stunning on the plate, and even better in your stomach.  Chicken thighs really give you a bang for your buck and this sauce takes them to a whole new level. I served the chicken on a bed of polenta (almost like grits, they are both made from cornmeal, but polenta is sort of the Italian mashed potato) and sautéed spinach to soak up the orange balsamic glaze. This recipe makes enough for you and your honey, grab a bottle of red wine and enjoy!

4 Chicken thighs- skin on
¾ cup Balsamic vinegar
2 tbsp apricot marmalade (you could use peach or orange as well)
½ cup Orange juice
¾ cup low sodium Chicken stock
1 sprig Rosemary, finely chopped
2 scallions (whites and light green parts only)
1 ½ tsp salt
1 tsp fresh cracked pepper

For Polenta:
2 cups low sodium chicken stock
1 cup water
8oz instant polenta (you can find polenta in most grocery stores)
1tbsp butter (at room temperature it will melt much quicker)
2tbsp half and half
1 cup grated Pecorino Romano cheese
2 sprigs rosemary finely chopped
1tsp salt
1 tsp fresh cracked pepper

For the Spinach
1 bag triple washed spinach
1 tbsp olive oil
1 clove of garlic, smashed (but not chopped)
1 small shallot, minced
Salt and pepper
Splash of water


This whole menu happens pretty quickly, everything happens in the time it takes to cook the chicken all the way through. To get started, heat a large non-stick pan with rounded sides (you wouldn’t want to lose any of that amazing sauce-trust me) to medium high heat. Add the chicken skin side down sear that side until this skin forms a golden crust. Sprinkle the other side of the chicken with the salt and pepper. While the chicken is searing, begin boiling the liquid combo for your polenta.
Once the skin has browned, flip the chicken-- the skin will have released some fat into the pan which is perfect for cooking on the other side. At this time, lower the heat to medium and add the remaining ingredients for the chicken all into the pan together and cook for 10-15 more minutes until it is cooked all the way through and the liquid in the pan has formed a glaze.
In another pan, add the olive oil for the spinach as well as the garlic clove and bring to medium low heat. By heating the smashed garlic and olive oil, the garlic flavor infuses into the oil. Once hot, remove the garlic clove and add in the shallots. Once the shallots have become translucent, add the entire bag of spinach along with a splash of water to help it steam and wilt, stirring continuously until all of the spinach has wilted. Add salt and pepper to taste and cover with a lid to keep warm.
After cooking the spinach, the water for the polenta should be boiling. Pour in the instant polenta, turn of the heat and whisk until the polenta becomes a smooth creamy mixture. Add in the remaining ingredients and whisk until incorporated. Cover the polenta with a lid to keep warm.
Once the chicken is cooked through, turn to coat all sides of the chicken and turn off the heat.
To plate: create a puddle of polenta on the plate, topping with the spinach and 2 chicken thighs. Spoon sauce over chicken, pop the cork on the wine, and you’ve turned your kitchen into a gourmet restaurant!

Monday, August 15, 2011

Date Night! Lemon Caper Pork Chops, Easy Cheesy Rice, and String Beans

One of the largest complaints I hear about pork chops is that people just can’t seem to keep them moist. For me, the key to juicy piggy deliciousness is to brine them. Brining food in a saltwater mixture before you cook them helps them to become flavorful and tender. You will need enough brine to completely submerge the pork chops without any part being out of the liquid. Ideally, brine the pork for at least an hour, but if you only have a half hour you will still impart enough flavor and juiciness to do the trick.
I like to find a bowl or a Tupperware container that will hold both pork chops. Then, I fill a small amount of the container with hot water and add 3 tablespoons of sugar and 3 tablespoons of salt (the hot water ensures that they will dissolve into the liquid). Once dissolved, add cold water to fill the container almost completely and put your pork chops into the liquid. I also like to add some fresh course-ground pepper to the brine. Cover with plastic wrap and leave in the refrigerator. The rest of this romantic meal only takes 25 minutes (exactly the amount of time it takes to cook the rice according to the package directions)!

What you need for a romantic candlelight meal:
Pork chops:
2 Pork Chops (about 1 ½ inches thick)
Drizzle of olive oil
Salt and pepper to taste
Juice of 1 lemon
Splash of Vermouth (optional)
1 tablespoon of capers


For the Easy Cheesy Rice:

1 box of Rice Pilaf or Wild Rice
1 wedge of Laughing Cow Light Creamy Swiss Cheese

For the String Beans:
1 bag of Steam-in-the Bag string beans
Juice of ½ lemon
Drizzle of olive oil
Salt and pepper

Take the pork out of the brine and place on to a plate drizzled with the olive oil, salt, and pepper.

Begin cooking the rice according to the package directions. The rice should take approximately 25 minutes to absorb all of the water. About halfway through (12 minutes or so) begin to heat the pan for the pork chops on high. You are going to sear the pork chops first. Searing is creating a crust all over the outside of the chop to seal in the juices, then lowering the heat to cook it all the way through.
Once you create a nice golden brown crust on the outside of the chop, lower the heat, squeeze in half of the lemon along with the splash of vermouth, and cover with a lid to create a lemony hot tub. Allow the chops to cook about 6 minutes per side, flipping once and adding the rest of the lemon juice and capers covering with the lid again.


At this time also microwave the string beans according to the package directions. Once cooked sprinkle with lemon, olive oil, salt and pepper and mix to make sure everything is evenly coated.

Once the rice has absorbed all the water, stir in the Laughing Cow cheese.  To plate: place rice in the center of the place with the pork chop laying on top, pouring some of the pan sauce over. Add string beans and enjoy!


Thursday, August 11, 2011

Sweet Peas for my Sweet Pea

Sweet Pea Ravioli

When you’re in the mood for something like ravioli, you don’t have to go looking in the freezer section or spend your money at a restaurant. When I get the itch for ravioli I head straight for the supermarket! This time, I thought I’d fill it with some sweet peas for my sweet pea.  Making homemade ravioli not only looks impressive, but is incredibly simple and wonderfully fresh-tasting. Create a great shortcut for yourself by using Wonton Wrapper pasta sheets (you can find them in almost every supermarket) and frozen sweet peas (they are frozen at the very peak of their freshness and taste delish!), and you’ve got an elegant meal in no time. Create a simple sauce with just one pint of bursting cherry tomatoes and sliced garlic and you’re transported straight to flavor town!
You could also make tortellini, which is what I did with the leftover pasta sheets and filling (I’ll give you the how –to at the end of the ravioli recipe). To be totally honest, you may have to control yourself from eating this filling with a spoon! For those of you who have never had the pleasure of the magical combination that is peas and mint, it may quickly become one of your favorites! You could also use it as a dip, spread on a sandwich or appetizer on top of some toasted baguette slices. You’ll notice that this recipe makes a lot of filling, but it’s so delicious and versatile that I love to have extra on hand.
For the filling:
One box of frozen sweet peas
One large clove of garlic, chopped
¼ cup fresh grated Pecorino Romano cheese
3 tablespoons part skim ricotta cheese
1 teaspoon chopped fresh mint (that’s about 8 medium-large leaves)
1 tablespoon olive oil
Salt and pepper to taste

Simple Sauce:
Sprinkle of olive oil
1 pint cherry tomatoes
1 large clove of garlic, sliced or diced

To wrap the ravioli you need:
Wonton wrappers
Damp paper towel
Small bowl of water

To create the filling, you will need to first cook the frozen peas. Most packages of frozen peas now come with a bag that you can steam the peas right in the microwave. If not, just drop them right into some boiling water for about 3 minutes. While the peas cook, throw a few chunks of Pecorino Romano into a food processor (so much easier than the cheese grater arm workout). Don’t forget to save a little for later to sprinkle on top. Strain the peas and then throw them right into the food processor with the garlic, ricotta, chopped mint and olive oil. Give the mixture a whirl until it begins to form a puree (don’t worry if it doesn’t catch all of the peas, I like mine a little chunky so that you can still tell there are peas in there).  Once the puree has formed, taste it and add salt and pepper accordingly giving it one more whirl in the processor.
To fill your ravioli, create a little assembly line. I find that doing it on a cutting board is easiest with a landing plate next to it for your filed ravioli. Remove some wonton wrappers from their package and place between a damp paper towel so they do not dry out. . I like to suggest about 8-10 ravioli per person if this is your main course (5 for a side dish).   

Place a small dollop (I use a teaspoon) into the middle of the pasta sheet. Dip your finger in the water and spread along two adjacent sides, folding the dry sides to seal (as if you were going to seal an envelope). Make sure to try and press gently squeezing out as much air as possible. If you want to get a little fancy you can crinkle the edges with the back of a fork.

While the water boils, heat up a medium-sized saucepan with a sprinkle of olive oil. Add the cherry tomatoes, once they begin to burst lower the heat and add the garlic and sauté together making sure not to let the garlic turn brown. Once the garlic is cooked slightly, turn of the heat. When the salted water is boiling gently drop the ravioli in one at a time. Since the wonton sheets are so thin they will only take about 3 minutes to float to the top.  With a slotted spoon, gently scoop out the ravioli and place them directly into the saucepan with the tomatoes. Plate your ravioli and sprinkle the remaining Pecorino on top. Simply delicious!

If you want to get REALLY fancy, by adding just a few more steps you can turn this ravioli into tortellini. After folding the ravioli in half into a triangle, take the point (the one that makes a 90 degree angle), brush it with water and fold it up onto the portion of the pasta with the filling.

Pick up the pasta with the folded point facing you. Gently take the 2 ends, wetting one, and folding underneath the dry end.


Voila! Tortellini!

Tuesday, July 26, 2011

Fiesta Fiesta!


This salmon recipe is actually inspired by a margarita-filled “Fiesta Friday” night in which I actually attempted to “save” my brother’s chicken from getting dry as he cooked it. Being my brilliant self, I decided to add some of the salsa that was on the table into the pan when he wasn’t looking… this method has become a staple with my family-- adding just the right amount of acid, spice, juiciness, and a hint of sweetness (I love to use mango salsa for the combination of spicy and sweet). This may actually be the easiest recipe that takes no more than 20 minutes from start to finish whether you use salmon or chicken and always comes out juicy and delicious. Serve it with a super refreshing Fiesta Salad and you’ve got a winner.*If you are going to make the fiesta salad—read that recipe first! (it is immediately following the directions for the salmon).

My honey would also like to let you all know that this meal would go very well with a crisp, chilled wine such as Riesling or Sauvignon Blanc!

What you need for 2 servings

2 filets of salmon 6-8 ounces each

One container of your favorite salsa

1 to 2 limes depending on juiciness

Heat a skillet large enough for both salmon filets (but not so large that they are drastically far apart, you want the salsa to make a nice bubbly hot tub around the salmon) to medium high heat. Drizzle a little olive oil in the bottom of the pan and sear the top side of the salmon. Flip the salmon and add salsa to cover each piece as well as the lime juice. Cover the pan with a lid and change the heat to low. 


This is when the glorious hot tub begins! The salmon should take about 10-12 more minutes to cook fully through as it bubbles away in the zesty tomato and lime bath. Check the salmon with a fork in the thickest part of the filet, it should flake easily and be opaque.


For the Fiesta Salad:
2 ears of corn, removed from cob
2 avocados, diced
2 tomatoes, diced
1 cucumber, diced
2 limes
Salt and pepper

If you would like to serve the salad with the salmon dish (or any dish really!) the first thing to do is steam the corn—super easy just do it right in the microwave with a lid cracked in one corner and a little water drizzled in the container for 6 minutes. Then let them cool so you can handle them to cut the corn off the cob.

In the meantime, dice the rest of the vegetables—do the avocados last so they don’t brown. To easily cut an avocado into small cubes just score the flesh right inside of the skin and then scoop out the pieces. 


Put all of the veggies into a bowl and squeeze the lime juice on top with salt and pepper to taste. You could add olive oil if you like, but the natural flavors are really so delicious that I choose to let them stand out all by themselves.


So healthy! So easy!

Tuesday, July 19, 2011

Yummy-sta!

Any dutiful Greek grandchild knows that it would be a travesty to not eat every single plate of food your little old Yiayia (that’s Greek for grandma) puts in front of you. She sometimes is the greatest enforcer of getting children to try new foods—because if you don’t you will be shrouded with a cloud of Greek Yiayia guilt storm. With this recipe, a Yiayia could magically get you to eat right out of a vegetable serving dish. Yemista (yeh-mee-stah) is the Greek word for stuffed vegetables filled with a rice mixture that sizzle in a savory hot tub of juiciness in the oven.  You can choose just about any vegetable you like that will stand up in the oven, I used tomatoes as well as peppers (tomatoes happen to be my childhood favorite). If you do use peppers try to find those that are short and fat so that they can stand up. You can also choose whatever kind of rice you like-regular white, rice pilaf, wild rice, etc. I used wild rice because my honey and I both love the flavor and texture! You could eat these as a side dish or have more than one as a meal in itself.
You could also certainly make this a vegetarian meal by omitting the meat, equally as delicious--you could even substitute with other sauteed veggies like zucchini or eggplant.
This recipe yields 4 stuffed vegetables:
4 assorted vegetables (I made 2 tomatoes and 2 peppers)
One half onion-diced
2 tsp dried mint
One box of your chosen rice
1 pound of ground turkey or chicken (awesomely lean and equally delicious and your honey will never know it’s not ground beef)
4 thin pads of butter
You will need a little tomato sauce—I make big batches of my own and freeze up little portions of it but you can use a good quality store-bought or a can of tomato puree


First, slice the very top off (but save it! You need it for later!) and hollow out the vegetables making sure to leave a pretty sizable layer on the inside to keep the rice mixture moist and to not puncture it all the way through. If you are hollowing a tomato, make sure to keep the pulp from the inside because it will be going into the rice. For the peppers, slice the top and make sure to remove all of the seeds and as much of the ribs as possible (ribs= white flesh along the crevices of the inner pepper).


Next, dice the onion into small pieces and add a little olive oil to the same pot you’ll be cooking the rice in. Set the pot on low heat and add the onions—you want to cook them low and slow, not going for a real caramelization here. However, you still want them to become soft and translucent.
While the onions slowly melt down take the pulp of your tomatoes and chop them into about the same dice as your onions and add them in with a dash of salt and pepper and a little sprinkle of dried mint.
Next, add in the meat and the rest of the dried mint, salt, and pepper with the tomatoes and onions until it is fully cooked through (the same way you would for tacos or Bolognese).  Then add in the rice, coating it with the meat and veggie mixture.
Note: it is important to purposely leave the rice a little undercooked because it is going to continue to cook in the oven.
Following the package directions, add about ¼ cup less water than the directions call for, cook the rice along with the meat, onions, and tomatoes.
In the meantime, in a small sauce pot, warm up about ¾ cup of sauce mixed with ½ cup of water so that it is not as thick.
Once the rice mixture has absorbed almost all of the water, taste the rice. You want it a bit undercooked but not totally crunchy—if you feel it is too crunchy add a little more water and let it cook until tender.

After the rice is finished, add about half a cup of the sauce and stir until combined. Sprinkle a little olive oil over the bottom of a baking dish that will hold all 4 of your veggie containers without touching each other.
Fill each veggie container to the top with rice mixture then top with a little sauce, a pad of butter (reeeeally thin, less than a tablespoon) and then place the top of the vegetable back on.

Once they are placed in the pan, drizzle a little olive oil on top to create a nice browning effect while they are in the oven. Bake at 350 for 25-30 minutes (half way through open the tops of each vegetable and add a little water) until the rice is just fully cooked and the vegetable is soft and browned from the oven.


Delish! My babe and I ate them with lamb chops (sort of a Greek inspired meal) and he raved about them! Time to go make them for your special someone!

Friday, July 15, 2011

Lemon Dijon Flounder

It’s easy to think of lemon as a traditional accompaniment to fish. But when lemon gets paired with Dijon mustard, it’s a match made in savory heaven! This recipe takes flounder from belly flop to an entrée that is sure to make a splash! (Oh how corny!) This recipe could really work well on just about any white fish like cod or tilapia, as well as on salmon so get creative! You’ll see that I made what seems to be feast, but flounder pieces are SO thin that each person could really have two pieces. You may also be wondering why I’ve cooked up so many portions when this blog is about cooking for that “someone special”… it’s because someone special doesn’t always have to be your honey! It could be your family, your friends, or you! This flounder recipe literally takes about 20 minutes from start to finish and is absolutely divine! I served it with mixed sautéed veggies but you could pair it with any sides you like—rice pilaf, string beans, salad… get crazy!
This recipe is for 4 servings:
Note: if you are using a bigger/thicker piece of fish (say salmon or cod) you will only need 4 pieces

8 flounder filets
2 tbsp of Dijon mustard (whichever is your favorite variety, I love a real grainy stone ground)
3 to 4 tbsp of butter
Zest of half a lemon
Juice of half a lemon
2 sprigs of thyme, finely chopped for garnish
Salt and Pepper
First things first- let the butter come to room temperature. This will allow the mixture to become like a paste that you can slather all over your fish filets. If you really just can’t wait to get your taste buds into this pool of lemon mustard buttery goodness (or you just don’t have time to sit around and watch butter go from a solid cold stick so a creamy bar of guilty pleasure) you can always microwave it 10 seconds at a time until you reach the desired consistency. DON’T melt it all the way! You want to be able to work it with your hands and spread it onto the fish (almost as if you were spreading cream cheese on a bagel).
Combine the first 4 ingredients, and a dash of pepper in a bowl and whisk or mix together to form the coating for your fish (that eventually becomes the delicious steamy sauce as it cooks up and melts in the oven!)
Lay a piece of aluminum foil on a sheet try or baking dish and lay out your pieces of fish, giving them a light sprinkle of salt and pepper. Then slather each filet with an equal amount of your mustard mixture and pop them in the hot tub (ok oven) at 350 for about 10 minutes (probably even less). This time may vary depending on your oven; check in on them about 5 minutes through. You will know they are ready when they become completely opaque and are flaky and tender when you prod them with a fork. Once you take them out of the oven, sprinkle your chopped thyme over the top of each piece. Thyme has a great earthy/lemony flavor to it and it takes the fish to a whole new level.

You can serve the fish right from pan to plate—or for a really nice preparation, place the fish filets on a platter and pour the sauce in the pan over top, then sprinkle with thyme.

Thursday, July 14, 2011

Bursting Blueberry Granola Pancakes

With the weekend comes cravings for insanely delicious breakfast foods that are also usually insanely detrimental to our waistlines. Here’s a great recipe for a breakfast classic packed with protein, fiber, and antioxidants to keep you satisfied longer. These pancakes are inspired by one of my favorite brunch spots in Savannah, GA with blueberry “crunchcakes” on their menu. These crunchcakes are packed with delicious granola and studded with warm bursting blueberries. Last weekend (after the 2-for special on blueberries at the supermarket) I decided it would be the perfect time to recreate them for my man to go along with our Berry Smoothies! I use store bought pancake mix to save time (because Saturdays are about relaxing of course!)  Here’s the recipe for 6-9 pancakes:

Follow the box directions for 6 -9 pancakes and mix the batter according to package directions. Be careful not to over mix.. . over mixing=dense heavy pancakes! And no one wants to feel like they need to take a nap right after they finish chewing their last bite of food.
This is where most people would think to add the blueberries, BUT! I find that when you add them in the pancake mix you end up with some pancakes that are loaded and some that just don’t reach the pancake-to-blueberry-quota (and let’s face it, I won’t even eat a chocolate chip cookie that doesn’t have at least 5 chocolate chips showing on top!). So what I like to do is mix the batter and poor it on the griddle, just like you would to make normal pancakes, and then add the blueberries and granola on top. There are two reasons why I think this is exceptionally delicious:
1.       You can control the amount of blueberries that will become warm and bursting with flavor in your pancakes.
2.       The granola (that is already sweetened with naturally delicious honey) actually gets to make contact with the griddle and create a little extra carmelization from the honey! YUM!
I use my favorite brand of granola, the vanilla and almond flavor, with whole almonds in it! (Always a treat to get some of those almonds into the pancakes as well!)
Preheat your griddle on medium-low heat and lightly grease it (my trick here is to just pull the paper back on a stick of butter and just zig-zag the end across the hot griddle to give you just enough butter and nothing more).
Pour your batter on, and then drop your granola and blueberries on—as rustically or artistically as you like.

The rules are the same here as they are for regular pancakes, when you see the bubbles-flip! That’s all it takes to make delicious blueberry granola pancakes!
For a little extra fancy shmancy-ness (and a healthier alternative to processed syrup) serve with honey instead!

My Babe's Berry Smoothie

I love when I can find 2-for specials on delicious produce at the supermarket. Last week mine had a great 2 for special on blueberries! This of course inevitably means that we end up with way more blueberries than we know what to do with and have to get creative. Saturday morning seemed like the ultimate time to enjoy some blueberry granola pancakes (recipe to follow) and these Triple Berry Smoothies filled with rewarding antioxidants and calcium to get your day going! But all your honey will realize is that they are insanely delicious! Serve them in nice tall pint glasses, sprinkle a few blueberries on top, and enjoy!

What you need for 2 smoothies:

½ pint of blueberries
4 small yogurts—2 strawberry and 2 raspberry
½ cup of skim milk
2 glasses full of ice (you can use the glasses you will be serving them in)


In the blender combine the first three ingredients and mix until the blueberries are completely blended and look like delicious little specks of blue confetti throughout the yogurt mixture.
At this point, if you think you and your sweetie may want your smoothie a little sweeter you can add one tablespoon of honey for just the right touch!
You can now add the ice and blend to your desired consistency. I like my smoothies on the creamier side (more of a milkshake-like texture) so I blended until the ice was almost completely liquefied.

Top with a few blueberries and voila! Delicious Berry Smoothies for you and your Babe!